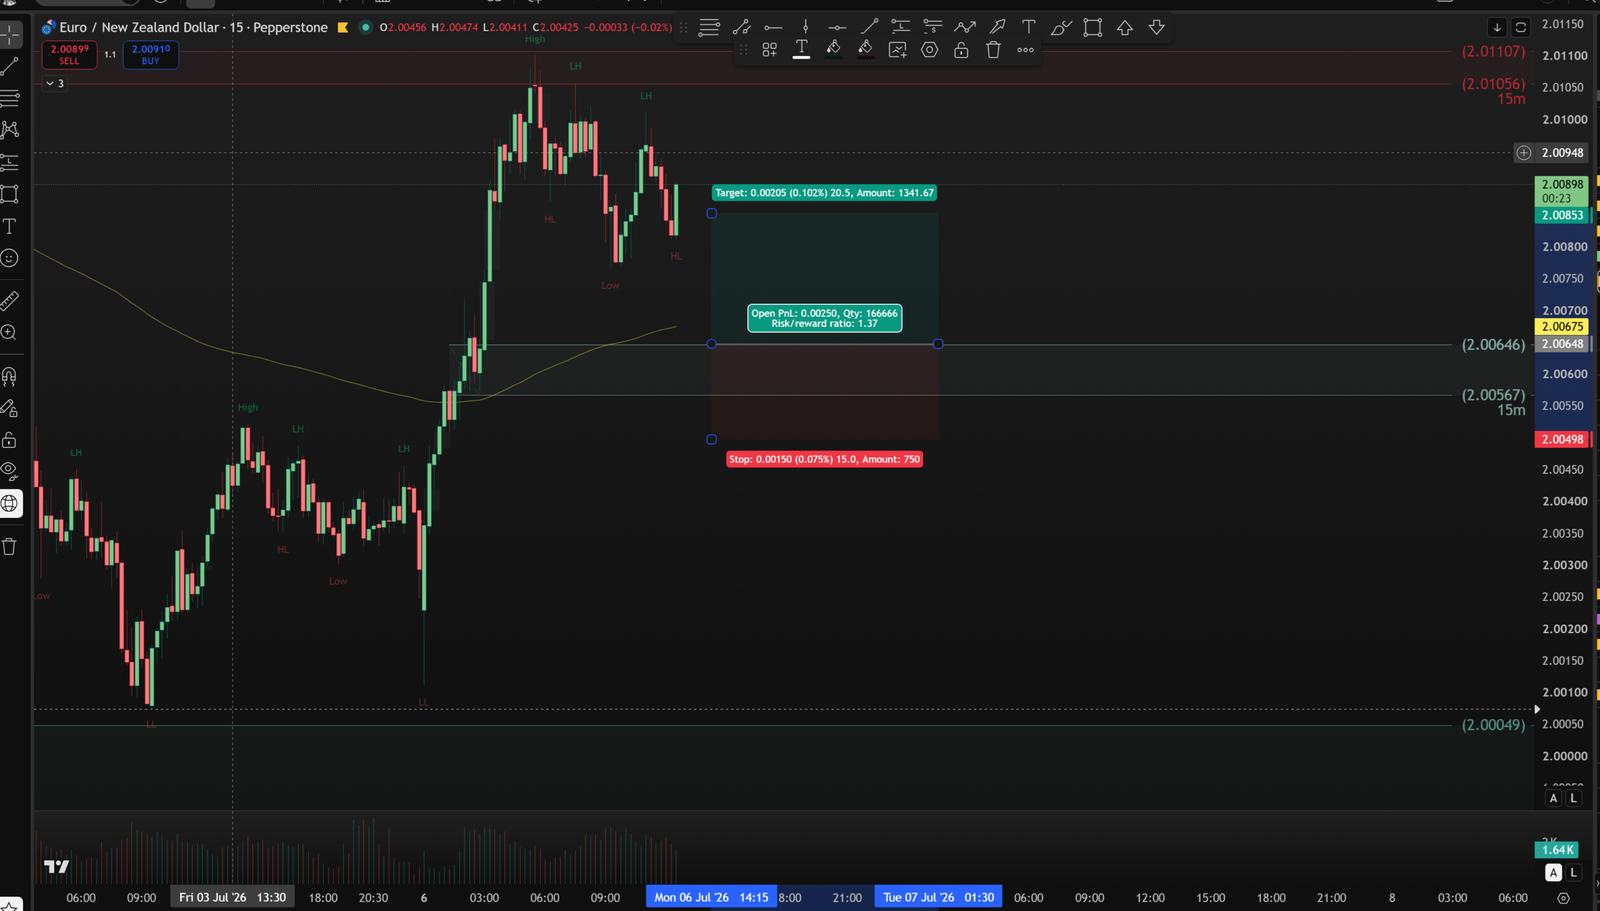
Pair: EURNZD
Entry Timeframe: 15M
Bias Timeframe: H4
Trade Type: Long limit / demand-zone retest
Date/Time: Mon 06 Jul ’26, around 14:15 chart time
Result: Missing — no closed trade history or final outcome shown.
Trade Idea
Price made a strong bullish displacement from the lower 15M area, creating a clear impulsive move higher. After the push, price pulled back toward a 15M demand / imbalance area near the prior breakout structure.
The trade idea was to buy the pullback into the 15M demand zone, expecting continuation back toward the recent highs.
This fits the set-and-forget process: identify the ETF zone, check H4 trend/curve, then place the pending order and manage after entry. The strategy notes also state that for a 15M entry, H4 is the higher timeframe to use.
Trade Details
Direction: Buy
Entry: Confirmed — 2.00646
Stop Loss: Estimated from screenshot, exact price not provided
Approx. SL: around 2.00496–2.00498
Take Profit: Estimated from screenshot, exact price not provided
Approx. TP: around 2.00851
Risk: Confirmed — 15.0 pips / 0.00150
Reward: Confirmed — 20.5 pips / 0.00205
Risk-to-Reward: Confirmed — 1.37R
Position Size: Confirmed — 166,666 units
Open P/L at screenshot: Confirmed — +0.00209
Setup Quality
15M structure: Bullish. Price created a strong move up, then pulled back from recent highs.
15M zone quality: Valid-looking demand area because the move away was aggressive.
H4 bias: Missing — not visible in the screenshot.
H4 curve location: Missing — no H4 supply/demand context shown.
Trade grade: Incomplete / cannot fully grade without H4.
Because the H4 trend and curve are missing, this should not be marked as a confirmed high-odds setup. It can only be logged as a 15M demand continuation idea until the H4 confirms whether the trade was aligned with trend and in a good curve location.
Management Plan
Since the H4 context is missing, manage this more cautiously.
Primary plan:
Move SL to breakeven or reduce risk once price reaches around 1R.
TP plan:
The visible target is about 1.37R, which is reasonable if H4 context is unclear.
Invalidation:
If price returns into the demand area and breaks below the stop, the bullish continuation idea is invalidated.
Screenshot Notes
Price had already moved in profit when the screenshot was taken. The long tool shows the trade active and close to the upper half of the risk-reward box. There is nearby resistance above around the recent 15M highs, so holding for a much larger target would need H4 confirmation.
Journal Summary
This was a clean 15M long from a demand-zone pullback after strong bullish displacement. The execution area makes sense on the entry timeframe, and the R:R was acceptable at 1.37R. The main missing piece is H4 context. Without H4 trend and curve, this should be treated as a cautious setup rather than a confirmed high-odds set-and-forget trade.